Saturday 11 November 2017

Wrapping up warm - the Gaia coat

I've been thinking about making a coat for a couple of winters now. When I saw the newly-released Gaia coat from Named Clothing, I knew this would be the year I would finally take the plunge. I bought the pattern as soon as I saw it - it was exactly the kind of coat pattern I had imagined myself wearing. Luckily, that was a week before GBSB Live so I was able to buy fabric for it there. Coating and wool fabrics were definitely a theme for a lot of the stalls there, I really was spoilt for choice. The coat has two main outer fabrics and is fully lined. I opted for British-made wool fabric from Fabrics Galore in different shades of green. 

This was definitely one of my most ambitious projects to date. There were so many pattern pieces that it took all my sewing sessions (which are admittedly limited to nap-times and evenings) across a whole weekend. The first thing I conquered was the lined pockets with pocket welts which I was ridiculously proud of. 

I really took my time making this coat as it included a lot of new techniques and the fabric wasn't cheap. Overall, the instructions were OK, but aimed at people with a reasonable amount of experience. There were many times I had to re-read or even go freestyle to work out how things should come together. 

I am really pleased with the finished coat. It is a very loose fit, but that is deliberate (and means I can layer with cardigans). There are a couple of things I'm not 100% happy with - the collar doesn't sit as flat as I would like it to and it's not as warm as I had hoped it would be. Next time I make a coat, I will choose a heavier coating fabric or line with interfacing. 

Here are a few photos:


Monday 30 October 2017

The 'Cocktail' dress

I went to the Great British Sewing Bee live back in late September, and what a fabulous day out it was. We attended a workshop on professional finishing techniques, where even Mum learned some new techniques, saw lots of stars of the show and were in heaven with stall after stall of beautiful fabric. I was very sensible and wrote a list of all the fabric I needed before going - and I almost stuck to it! Towards the end of the day, I spotted some amazing cocktail print cotton lawn at the Sew Me Something stall and just had to have it!

A few weeks later, I was due to celebrate a 'big' birthday and decided I needed a new dress for the many celebrations I had planned. I wasn't sure what pattern to go for, but knew it had to be made from this fabric. In the end, I decided to keep it simple with yet another Bettine Dress from Tilly and the Buttons. I had a few meals out planned and the casual style of the Bettine combined with this fabric seemed perfect for a variety of events. 

I ended up making this very last minute, so opted for the plain option without pockets or sleeve tabs. I haven't made a woven Bettine for a while (the last two were stretch), and I loved the simplicity of putting it together. It's also a while since I have sewn with cotton lawn and I had forgotten what a pleasure it is to see with (and how comfortable it is to wear). The whole thing only took an afternoon and an evening and I even had enough fabric left over to line a dark denim Agnes Bag (not blogged).

I've worn the dress four times now, and I love it!


Friday 15 September 2017

Campsite chic - harem pants and raglan tees

After a hectic Summer, I'm finally getting round to blogging all the stuff I frantically made in preparation for our holiday.  We decided to spend our main holiday in the UK this year - a bit risky but it worked out well - nowhere near as much rain as expected, lots of beach days and only a two-hour drive home at the end of it.  We had a two-site holiday in Wales, spending the first week glamping on the Mawddach Estuary near Dolgellau and Fairbourne and the second in Rhosneigr in Anglesey.  Both equally beautiful in different ways, but they real challenge for me was week one - a whole week without a washing machine with two small children...  The only option was to get sewing so we definitely had enough practical and comfy outfits to make it until we got to our luxury apartment with washing machine in week two!

I have been following Made by Jack's Mum on Facebook for a while after seeing so many harem pants, sweatshirts, t-shirts and other kids clothes made by people on other groups.  I love the simple style and the fact that they are all made using knits, which is pretty much essential for kids clothes (who wants to add even more to their ironing pile!?!).  I was finally tempted to buy the famous harem pants pattern when they ran a flash 50% off sale on all patterns, and I bought the raglan t-shirt pattern at the same time too.  

The first versions I made of both were for Polly.  I bought some fabric from the bargain section at Abakhan in Manchester (where they sell fabric by weight - it takes a bit of getting used to, but you can pick up some great quality fabric at rock bottom prices).  She is obsessed with watermelon, and I couldn't resist an organ get jersey with a bold watermelon print with co-ordinating plain organge jersey.  I used the print for the legs and the plain for the ankle cuffs and waistband.  As soon as I made the harem pants, I understood why they were so popular - they literally take minutes, and the fit and style are both perfect for active kids.  I made a matching raglan, using the watermelon print for the sleeves and neckband and the plain for the body.  The raglan is a little tricker to make as it involves topstitching, but it's still a pretty quick sew, and it goes perfectly with the harem pants to make a co-ordinating outfit.

I moved on to a grey and blue striped raglan with plain grey harems for Thomas, all made with scraps from my stash.  Then I went mad!  Three more pairs of harems for Polly, two more and another raglan for Thomas, all using fabric from my stash.  I also made three pairs of harems as presents for other children, all in various sizes.  After 10 pairs of harem pants, I'm still not sick of this pattern and have got the fabric lined up for the next pair.  In addition to being such a quick sew, the kids love wearing them - in fact, the biggest challenge I had was wrestling them away so I could wash them when we finally got back to civilisation!

A few pics:


Sunday 30 July 2017

Ruffle sleeves and flamingos

It seems you can't move for ruffle sleeves in the shops at the moment. I had been planning a pattern hack to add them on to a woven top pattern, then the latest Love Sewing arrived (issue 42) and it included a pattern for a dress with ruffle sleeves. I decided to use the pattern to make a top ready to wear on a weekend away. 

I had some amazing flamingo print cotton bought from Abakhan a few months ago which I knew would be perfect for this project. As luck would have it, I also had a matching invisible zip. Although I used the pattern to cut out the top. I ended up ignoring most of the instructions and sewing it together using methods I am familiar with. Some of the instructions were counter-intuitive, so I decided to freestyle it. 

I'm pleased with the top, but it is a bit tight on the body, so only really looks right tucked into a skirt, such as my Ultimate Pencil Skirt. The sleeve ruffles were really easy, and it's nice to have something that is on-trend.  I'm tempted to make another version, but maybe grade up a size so I can wear it with jeans. 


Wednesday 19 July 2017

Board shorts for the (almost) birthday boy

Thomas's birthday is in August, right in the middle of the school holidays. Not only does this make him one of the youngest in the year, most of his friends are on holiday on his birthday. For that reason, we have had his party in July for the last couple of years, meaning he ends up getting two celebrations (lucky boy). His party this year was in a party tent we hired in the garden. I decided to make him some shorts to wear. 

I made the kid's board shorts for Thomas from the third Great British Sewing Bee book a couple of years ago, before I started blogging. They are a great way of using up small bits of fabric. The last pair were in grey jersey with a Star Wars panel. They were a big hit due to being so comfy and they still fit now!  I decided to make him another pair in a larger size, which will hopefully last for another couple of years due to the generous fit. 

I used a blue jersey with a fine rib from my stash for the main part of the legs, and some amazing Alexander Henry graffiti fabric for the waistband and side panels. Unusually, this pattern uses stretch and woven fabrics, but they came together well. I added quite a few more rows of shearing than stated in the pattern as I was nervous that they would be too big round the waist. As it turns out, they are a pretty loose fit on the legs but the waist fits fine. A big thumbs up from Thomas who has worn them loads. Unfortunately, it was too cold and rainy for shorts at his party, but he wore them the next day instead!


Tuesday 11 July 2017

Smart Summer style - Sew Over It Ultimate Pencil Skirt

I've decided to formalise what I have mostly taught myself about sewing and pattern cutting by applying for an evening course at college.  I was really excited to be invited to an interview last week. In addition to putting together a portfolio, I decided to put a piece of African wax fabric that Mum bought me to use as a pencil skirt. I had been saving this fabric for ages. It is so beautiful but I only had a metre and wanted to put it to best use. 

I have made this pattern before using a kit from Sew Over It and have been planning to make again ever since, as the fit is really good for me. As this is such a summery fabric, I decided not to line the skirt - I'll never be wearing it with tights. It was a real challenge to squeeze the pattern pieces out of one metre, but after a lot of rearranging and re-folding, I managed it!

This is a very straightforward make with a couple of darts and no separate waistband (it has a facing instead). As with all Sew Over It patterns, it is a good fit for me with very minimal adjustments. I'm so pleased that I chose to make this pattern with this fabric. The fabric has enough structure for this skirt and the bold design makes it a real statement piece. 

I made a simple cotton t-shirt using New Look 6217 in bargain white fabric I bought as part of my super haul at the Handmade Fair. This is a lovely quick sew and it  is simple enough not to detract from the skirt. 

So all in all, a great outfit to showcase my skills and fabric choices at the interview. Only spanner in the works is that we were informed on arrival at the interview that the course is heavily over-subscribed so there are no spaces left. Although I'm hugely disappointed, I'm on the waiting list and can always reapply for the following academic year if I am unable to study this year!


Wednesday 5 July 2017

Super comfy but the jury's out - the Cocoon Dress

The latest issue of Sew Now magazine caught my eye when picking up some reading material for a long train journey, mainly due to the free gift - the Cocoon Dress by Simple Sew. It was quite an unusual style and I thought it would make a super-comfy and wearable day dress for Summer. 

I've had some lightweight spotty denim in my stash for ages, which I had planned to make a shirt dress with. However, I picked up some old curtains from a charity shop which I am planning to use for that project instead.  I've seen a lot of unstructured denim dresses about this Summer, so decided to use this fabric for the Cocoon Dress. 

I chose the short sleeve version, which has grown on cap sleeves bound with bias binding. My favourite design feature is the deep in-seam pockets (got to love a dress with pockets).  I actually cut two broad strips of the fabric to use instead of binding as suggested, which give the impression of turned-up sleeves. It all came together really easily, and I am pleased with the v-neck, something I have found tricky in the past. All in all, it was a couple of hours sewing. 

As predicted, the dress is super comfy and ideal for my un-air-conditioned office in the Summer. However, I'm not sure if I like the style and I'm not convinced it is very flattering. I'll keep wearing it and decide whether I love it or not....


Sunday 18 June 2017

Happy Father's Day - a dad-style retro Hawaiian shirt

With Father's Day coming up, I struggled to think of something to make for Dad. My inspiration came from Gareth when I was sorting through my fabric stash and he saw some of the fabric I bought on my trip to Manila back in January. He commented that it was really retro and would make an awesome shirt. I remembered this and decided to use it to make a Hawaiian style Negroni shirt for him. Dad spends a lot of time on holiday and already has a few Hawaiian shirts that he takes with him, so this seemed like an excellent idea. 

I only just managed to cut the shirt out because the fabric has a border print and I didn't have much. I had to make the inside back yoke in a contrasting fabric. I also cut it out a size larger than I would normally do, as I think that style of shirt should be worn bigger. When I made a Negroni for Gareth earlier in the year, it took ages and I was worried about finishing this on time. However, the short-sleeved version is so much quicker - I hadn't taken into account just how fiddly it is doing the cuffs and openings on the long-sleeved one. This went pretty much without a hitch, or so I thought. When Dad tried it on, he struggled to do up the buttons because I had sewn them on the wrong side  out of habit!  It still looks pretty awesome though - Happy Father's Day Dad, hope you had a great day xxx 


Saturday 17 June 2017

You shall go to the ball... Burda 6518

I keep thinking back to just over a month ago when I went to the amazing Dressmakers Ball run by Crafty Sew&so in Leicester. I've been meaning to blog about it ever since, but life kept getting in the way!  

As soon as I saw another blogger mention buying tickets to this event, I knew I had to go!  Mum and Liz were both up for it as well so we made plans. Being super organised, Mum made her dress months before the ball - a fabulous 50s style tea dress in Frida Kahlo fabric by Alexander Henry. Liz and I are a bit more last-minute, so both ended up sewing right up to the wire!

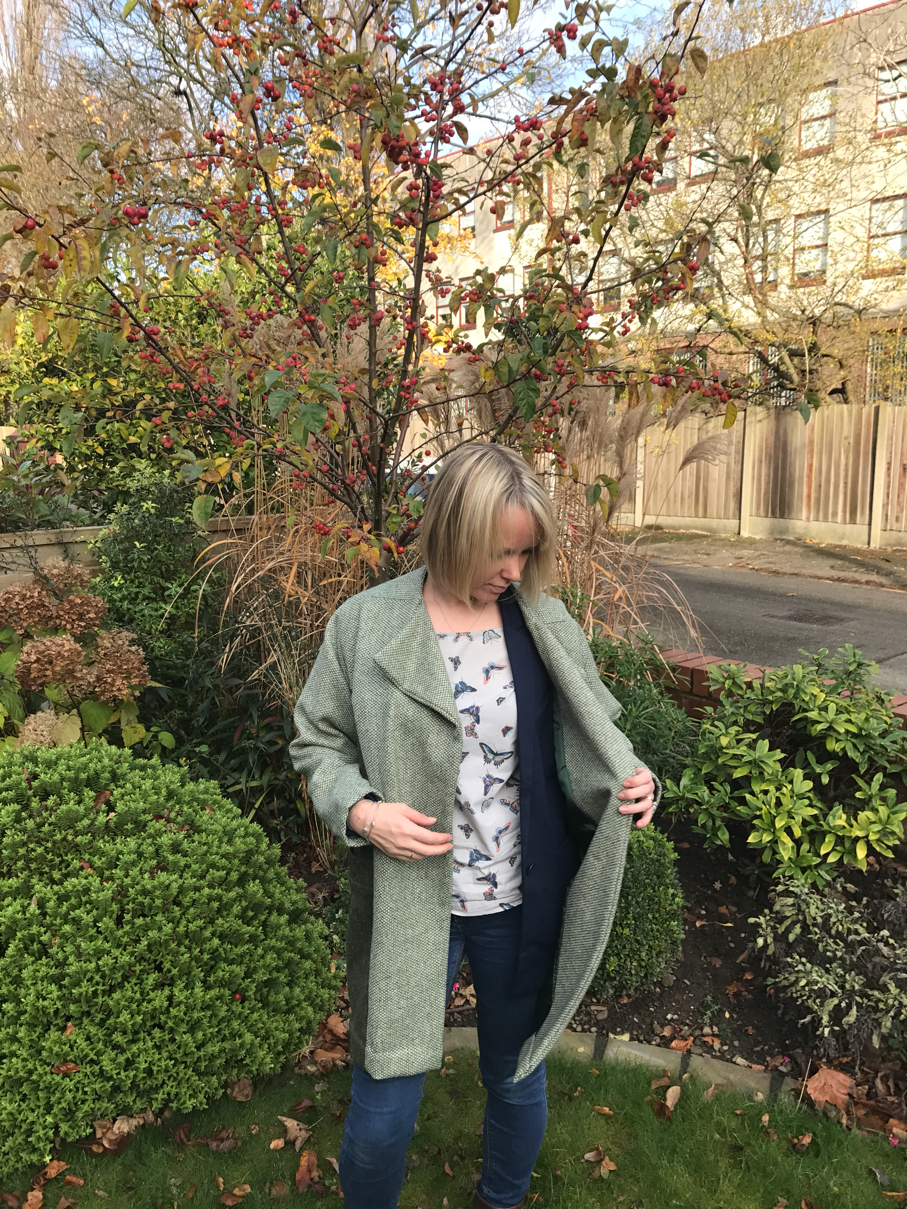
I knew I wanted a 70s style maxi dress and searched everywhere for the right pattern, dismissing loads along the way because I was unhappy with the neckline or sleeves. I eventually settled on Burda 6518, which was more contemporary than I had planned. I decided to make the long sleeveless version, and bought metres and metres of fabric from myfabrics to make it - I've never made a dress with so much fabric!  I chose a navy floral georgette for the main fabric with a navy lining.  

The bodice took ages, mainly down to having 3 layers of fabric. I was really pleased with the look of it and my fabric choice. The skirt was straightforward to sew but again it was time-consuming due to the sheer volume of fabric involved. I had a few disasters along the way, including accidentally throwing away my first zip, then taking four attempts to get the second one in only to snip the end off it rendering it unusable. I was millimetres away from throwing the whole thing away at that point! Thankfully, it was third time lucky for zips. 

I only had to make a few adjustments to the shoulder seams before attaching the lining, in order for it to hang right. Following the instructions to the letter, I attached the lining at the neckline but not the armholes, despite this going against my instincts. The pattern calls for arm facings and cuffs, yet the instructions on attaching these left me bamboozled. I tried every possible way I could think of and eventually got them in. However, the seam allowances meant that the armholes cut away far too much and I felt uncomfortable with the look of the bodice. I decided on a last minute change to add in the cap sleeves from the short version. This solved the problem and also gave the dress a bit more of the vintage look I was after. 

With two days to spare I finished. Liz finished hers the night before - a ruby dress in beautiful navy fabric from Guthrie and Ghani. We all had a fabulous time at the ball, with the best part being able to talk non-stop about sewing all night without anyone getting bored!  Can't wait for next year's ball - I'm thinking about what I will make already. 

Here is my finished dress:
 

And here is a pic of the three of us:


Tuesday 6 June 2017

Holiday Maxi - Butterick B6051

I have been incredibly lax at blogging recently. This has been down to starting a new job, birthdays, weekends away and a holiday. I've actually sewn tons of stuff since I last blogged, just not got round to writing about it. I will catch up soon, including the fab dressmakers ball and a number of dresses for work. In the meantime, I wanted to write a quick post about my latest make, a maxi dress for my holiday. 

I bought some fabulous hot pink and black chevron jersey from Girl Charlee when they had a flash chevron sale. I knew it would be perfect for a maxi dress, even though I didn't have a pattern at the time, so I got 3m to ensure I would have enough. I have been searching on and off for a jersey maxi dress pattern for ages as two of my favourite pre-sewing Summer dresses were knit maxis. I spotted Butterick B6051 in a pic in my Instagram feed, as part of a photo of loads of different patterns then searched for it and found I could make it with jersey so ordered the pattern. 

As with all best-laid sewing plans, I totally ran out of time to make this before my holiday and had decided to make it for when I got back instead. However, I had a last minute change of heart and decided that I NEEDED this dress to take to Tenerife and started making it the evening before I went away. As usual, if there is a way to make my life more difficult, I can be guaranteed to take it. 

This was a relatively quick and easy sew, but the sheer volume of fabric involved meant that cutting out took ages. The bodice had a turned under neck seam and I ended up stitching this with my normal machine rather than my coverstitch because I was making it in such a rush and the coverstitch machine was away in the cupboard!  I would have got a more professional finish using the other machine, but needs must. The elastic either side of the waistband ended up adding a bit of bulk with the seam allowance, something I would definitely try to remedy if I make this again. 

In retrospect, the fabric is probably a bit too fine for the pattern and it would work better in a thicker knit or even in a fine woven (although that wouldn't have the benefit of being crease-free in a suitcase). The weight of the fabric in the skirt does make it feel as though the bodice if being pulled down, although I don't think this is all that noticeable when wearing it. I'm still in love with this fabric, and pleased I saved it for a maxi. 

I didn't get too many pics, but here I am ready to go out for tapas:


Tuesday 18 April 2017

Date Night Dress - Butterick B5488

Last week I went on an actual date with my lovely husband, one that didn't just involve drinking wine at home in our pjs. This was all thanks to my Mum and Dad who took the kids for a week during the Easter holidays. As going out (especially together) is such a rare occurrence these days, I felt like I should make a new dress for the occasion! 

I bought some fantastic navy blue georgette with birds printed on it from Abakhan in Manchester the other week (fabric buying ban failed!). I fell in love with the design and justified it as I am making an evening dress in georgette in a few weeks' time and wanted to practice. The pattern I had in mind was Butterick B5488 which came free with issue 38 of Love Sewing Magazine. I really like the loose tunic style and semi-structured neckband on this dress. 

The pattern is relatively straightforward to follow, but I always find that the instructions and diagrams from the big pattern houses aren't as clear as those with indie patterns. Although I managed to make the neckband without any issues, I somehow managed to forget to insert the sleeves before attaching the band to the dress. The soft pleats work really well with this kind of drapey fabric. I was initially concerned that the fabric was a bit see through, but the volume of fabric used and the colour prevent me from flashing inappropriately!!

The neckband doesn't sit 100% straight, even after ironing. But it's not really noticeable and doesn't spoil the garment at all. I do like how loose this dress is, perfect for going out for a big meal!


We went to Chilli Banana Thai restaurant - would definitely recommend!

Thursday 6 April 2017

One for me, one for you - M6927

McCalls M6927 was the free gift with Love Sewing magazine a couple of issues ago. The version with the dipped hem caught my eye and I trawled through my stash in search of some suitable fabric. I bought some pink crepe with a bird design from Fabrics Galore about 18 months ago. I was tempted to use it for another pussy bow blouse, but settled on it for this instead. 

This is a really quick sew with only a few pattern pieces. Annoyingly, the envelope didn't give all the finished garment measurements, so I felt like there was a bit of guesswork about the sizing. I've been feeling a bit fat recently, so I ended up cutting out a size bigger than I would normally make. In retrospect, this was a mistake as it is too big around the shoulders and arms (and I've lost a few pounds in the last few weeks). I don't think the finished result is very flattering at all, although it is quite versatile for wearing with jeans or a skirt. The fabric was very slippery and quite difficult to work with, especially on the hem as it wouldn't iron into place and I had to use practically a whole pincushion worth of pins to keep it in place at the curves. I keep reading about special hemming feet which make this much easier and I'm tempted to invest after this project!

I made another version with 3/4 sleeves for my Aunt's birthday, and I'm pleased to say that I got the fit right on that one. I used some of the fabric I bought in Manila for this. It was also crepe, with a cute apple design. Although hard to work with, it does give the top a more dressy feel. 


It's almost that time of year again, so I am posting my pledge   for this year's Me Made May:

 'I, Alex Howard of Alex's Adventures in Fabric @adventuresinfabric sign up as a participant of Me-Made-May '17.  I endeavour to wear at least one me-made item each day for the duration of May 2017'

Saturday 1 April 2017

Another freebie - the Free Spirit dress

A few weeks ago, i heard about a new girl's dress pattern by Duchess and Hare. The pattern was free to members of their FB group - unable to resist a freebie, I downloaded the PDF as soon as it was released. From the sample pictures, it seemed really versatile with lots of options for customising. 

I decided to make a version for Polly as she is starting to outgrow half her wardrobe.  Looking to my stash, I found a couple of potential fabric choices, but the dress needs more fabric than I initially thought due to the fullness of the skirt. A few people have made it with a contrasting bodice, but the fabrics I had didn't really lend themselves to this. Then I remembered some blue corduroy with teddy bear print that one of my Mum's friends had given me. I had just the right amount and it went well with some leftover ribbon from the Flo Dress I made for her first birthday. I also had a scrap of blue paisley lining fabric for the lined bodice. 

I decided not to add the bodice pleats because the fabric is quite thick and heavily patterned. They do look good on lighter fabrics though, so will definitely add if I make another version in future. Attaching the bodice to the lining used a method I hadn't tried before. Described as rolling it up like a burrito, I was initially confused and had to re-read the instructions a few times. Once I did it, it worked brilliant and was like a magic trick!  I did mess up the simplest part - sewing the sides of the bodice together. I ended up unpicking three times. Gareth came in to talk to me at one point and went straight back out as he knows that it isn't a good time if the unpicker is out and I've got a face like thunder!

I decided not to add the in-seam pockets as Polly isn't really bothered by pockets yet, but will definitely include them if I make it again when she is older. The skirt uses a lot of fabric and very tightly gathered. I always love this look for girl's dresses, but I think you could get away with using less if you didn't have quite enough according to the pattern. 

My favourite feature in the dress is definitely the keyhole back opening with ribbon tie. It makes it more dressy and will also be perfect for spring and summer. 

Polly loved the fabric when I showed her, and enjoyed showing off her new dress to friends. It's a bit big for her, but I'm pleased she can get plenty of wear out of it.  I struggled to get any decent pictures of her wearing it as she was far too busy playing!


Thursday 23 March 2017

Free patterns - toddler hoodie and harem pants

After all the clothes I've made for Thomas recently, I decided it was only fair to make something for Polly. I'm still on a self-imposed fabric and pattern buying ban, so I revisited all my patterns and found a printout of the Brindille and Twig baby and toddler raglan hoodie. I first downloaded and printed this free pattern when Thomas was little, but I didn't really have the ability to make it then. As I've now had a lot of practice with sewing knits (and also have a huge amount of them in my stash, I decided to give it a go. 

I had just about enough of the red and grey stripy sweatshirt fabric and ribbing left to make this for Polly. I dug around to find some more grey sweatshirting for the hood lining. I'm so pleased I finally gave this pattern a go. The instructions are really clear - I think I could have managed it all those years ago. The only issue I had was with the optional armhole details, as they were a bit too narrow to be seen properly. As with all kid's sewing projects, it was super quick to make due to the size, and the majority of this can be made on the overlocker which is always a bonus. I realised that this is the first time I have made anything with a hood, and I'm now planning to find a good pattern to make a hoodie for myself (once the fabric and pattern buying ban is over!).


I found a free toddler harem pants pattern on A Joyful Riot, in the hope of making a matching pair, but sadly couldn't squeeze them into the fabric. However, I loved the pattern so much that I decided to make a pair in some french terry I had left from making Hudson Pants earlier in the year. I also cut another hoodie so she could have a matching set. I made the armhole details wider this time, and was chuffed with the result - I know I'll be making this pattern again and again. The pants are a great pattern - only about 20 minutes to sew up and big enough to accommodate a cloth-bummed baby! Gareth reckons that she looks like a late 80s/ early 90s dancer in this get-up, but that's a good thing, right!?! 


Tuesday 14 March 2017

Thrifty stitching and stash busting

My name is Alex and I am a fabric addict. Yes, it's true - my fabric stash is out of control. I've now run out of places to store it all. I've banned myself from buying any new fabric until I have used some of my stash (mainly so I can create space to buy more fabric in future!). I've also accumulated a stack of patterns that I haven't got round to making, or that I would like to re-make. Time to tackle the stash, and save some cash in the process. 

My first project was another Cleo dungaree dress by Tilly and the Buttons. I bought some red stretch denim to make this in ages ago, and even had the clips, but it had been slipping down my 'to do' list. This pattern is an absolute delight - quick and easy to sew (with a bit of topstitching thrown in to make it just challenging enough). It's also super wearable. I've worn my olive green corduroy version to death, but it won't look right for spring and summer. The red version looks good with tights now, but I'm planning to make a couple of summery t-shirts to go underneath so I can continue wearing it into Summer. I added a couple of inches to the length this time as the other one was VERY short, which is ok with my 60 denier opaques, but I'm not brace enough nowadays to go that short with bare legs. 


Next on my list was a really practical make. Polly has decided she hates sleepsuits and only likes wearing proper pyjamas like the ones I made at Christmas. I delved through my stash and found two lengths of cotton lawn to make some pyjama bottoms for her. I used the same pattern as for her Christmas ones (Tailors Kids Pyjama Bottoms, free download). I've also used this pattern for all of Thomas's pyjama bottoms. Less than an hour later, she had a pair of vintage Liberty pyjamas and another pair in atelier brunette dandy fabric. 


I bought some plain white crepe from the Fabric Godmother at the Handmade Fair back in September to make a Sew Over It Pussy Bow Blouse. I finally made it a couple of weeks ago. I made version B this time (v neck opening), and I'm in love with how clean and simple it looks. 


Last but not least, I did cheat a little bit and bought the 'Quicker Knickers' pattern for 85p from Little Finch Patterns after seeing them on one of the sewing groups I am a member of on Facebook. The pattern was so cheap and a great way to use up scraps of jersey fabric (of which I have tons), that I felt it was a good investment. They sew up quickly and are a fantastic stash-buster. 


Wednesday 1 March 2017

A Star Sweatshirt for my little star

The latest issue of Love Sewing Magazine arrived last week and I was really impressed with the free pattern and the projects in the mag. I'll definitely be making the dress soon - I have some fabric that will be perfect for it. As I had loads of sweatshirt fabric left after making the Linden Sweatshirt, I decided to start off with the boy's star sweatshirt to use up some of the offcuts. 

They have started making the patterns (except the free gift) available as downloads only. I don't really mind, but it does mean that everything takes longer, as you have to print, cut and stick before you can get going. Annoyingly, there was a mistake in the PDF and I had to draft one of the pieces myself, based on the layplan and surrounding pieces. I didn't have enough plain fabric to do the star on the back, so I only cut one of each of the star pieces and self-drafted a back body piece using the back neckline pattern piece and the constructed front piece as a guide. 

 Attaching the front pieces together to make the star design was the most challenging part of the project. I used my overlocker to attach everything together, then topstitched with my coverstitch machine. I'm still getting used to using the coverstitch machine, and ended up having to unpick sections and re-thread the machine a few times. I'm still pleased with the finish it gives and will be practising lots over the next few months. 

The rest of the project was straightforward and the end result met with Thomas's approval (although he wanted me to finish in one evening and it took longer!). I like the star being plain and the rest of the sweatshirt being striped. I'd like to claim it was a deliberate design decision, but the truth is that I was dictated to by the amount of each type of fabric I had. The pattern goes up to age 11-12, so I imagine I will be making versions again for both kids as it is a good stash buster. 

Here is the finished result, and Thomas modelling it below:


Wednesday 22 February 2017

The Linden Sweatshirt - super quick selfish sewing

After the complicated marathon project that was the boy's shirts, I was up for some simple sewing. I also felt like making something for no particular reason other than I wanted to. My sister lent me the Linden Sweatshirt pattern by Grainline Studios when I 'accidentally' bought 2 metres of grey and red striped sweatshirt fabric from Girl Charlee (I thought it was jersey and had planned to make a long sleeved Agnes top to wear under my new Cleo dress, not blogged yet).  I've been planning to make this for a while and had spent ages sourcing some grey sweatshirt ribbing to go with it. I eventually found some in the Ottobre etsy shop and bought it, despite it being ludicrously expensive. 

However, when it came down to starting the project a few weeks ago, I was put off by the thought of pattern matching the stripes on the raglan sleeves. Inspired by another sweatshirt I bought ages ago, I realised that the solution would be to get some plain grey fabric for the sleeves. No pattern matching required and it would stop the stripes looking too much. My Mum picked up some plain grey sweatshirting at Guthrie and Ghani last time she was there (she's lucky enough to live nearby). 

When I finally got round to starting the project, I was pleasantly surprised at quite how simple it was. It can be sewn up entirely on the overlocker and the whole thing took a couple of hours at most. Although it isn't essential to finish all the seams using a coverstitch machine (or twin needle on a regular machine), I've hardly used mine and wanted to have a play. I'm still getting used to it, but I love the professional finish it gives.  There were a couple of hiccups, like when I made the rookie mistake of forgetting to put the foot down (think I thought I was still on the overlocker).  Even spending extra time doing this, it was still a one-evening project, which is exactly what I needed. Even better, I know I will get so much wear out of it. This is a fab pattern and one I will make time and time again. 


Sunday 12 February 2017

Matching shirts for my boys

I was confronted at Christmas by a cross Thomas. 'You're always making clothes for you and Polly and all you make for me and Daddy is pyjamas' he declared. So clothes for the boys made their way onto my sewing 'to do' list. 

The Negroni shirt by Walden (by Colette patterns) is another one of those sewing blogger staples that I've been planning to make for a while. I'd always been too nervous to attempt a shirt but making the Rosa shirt by Tilly and the Buttons gave me the confidence to give it a go.  Unfortunately, there isn't a pattern for a kid's version so I settled on Simplicity 8180 for a version for Thomas. I bought some navy cotton with white whales on it from myfabrics (looks better than it sounds!). I love the fact that shirts use a thicker cotton and that really opens up fabric design choices. Gareth chose the buttons on a solo trip to a John Lewis (with the help of the assistant).  

I spent a whole afternoon cutting out both shirts - there were so many pattern pieces. Thomas asked me to make his first so of course I obliged. I'm glad I've got quite a bit of sewing experience as although the pattern pieces were correct and went together well, the instructions left a lot to be desired. I made a couple of changes - the top button is supposed to have a rouleau loop but (partly due to my continued inability to make rouleau loops), I decided to do a normal buttonhole instead. I also added topstitching at the collar, cuffs and around the button stand (thanks for the suggestion Mum!). The most frustrating part of the whole project was trying to pattern match the pockets. I ended up cutting them out 3 times before I got it right. Thankfully I had plenty of spare fabric. 

I was pleased that I'd had a 'practice run' with Thomas's shirt when I came to starting Gareth's. The instructions were far clearer on this, but there were techniques I hadn't used before, like flat-felled seams. I spent ages pattern-matching the pockets again and just couldn't get it right, so gave up in the end, figuring it was less obvious on a bigger shirt. I also had to re-cut a number of pieces where the pattern was upside down or where I hadn't read the instructions properly and had only cut 2 instead of 4. I added the same topstitching detail as on Thomas's shirt, and also changed the top button placement. It didn't turn out quite as well on this but it isn't that noticeable when on. 

Neither of these were a quick sew by any means, but I would definitely recommend both patterns. The fit is great with minimal adjustment and the sense of achievement in making a shirt is fantastic!  I will definitely be making both again, possibly short sleeved versions for the Summer. 

Here they are ready to go to a birthday party:


And a full length photo:


Saturday 21 January 2017

Moneta in Manila

A business trip to Manila is obviously a reason for me to get stitching, but in the middle of January I didn't want to make something for the trip that I wouldn't wear again until Summer. The solution was to make a dress I could wear on the trip in the sun and also wear back at home with tights in the middle of Winter. 

The Moneta dress by Collette Patterns is one of those dresses that every sewing blogger under the sun has made at least one version of - it's such a versatile and flattering pattern. I can't believe I haven't got round to making it until now. I finally bought the pattern and some beautiful great and purple spandex viscose with bold wide stripes from Guthrie and Ghani. The colours were probably a bit drab for the beautiful Filipino sunshine, but more practical for rainy Manchester.  

As usual, I found I had bought far too much fabric when I started cutting out. The construction of the bodice was very easy on the overlocker. I also got a chance to have a first play with my new toy - a coverstitch machine which was my prize in the dressmaker of the year competition back in September. After a couple of false starts and a bit of frantic googling, I loved using it and the finish on gems is so professional. The skirt has in-seam pockets and these went in well. To gather the skirt, you need to use clear elastic which is shirred. I hadn't used this method for gathering skirts before, only for knicker elastic!  I wasn't as neat as I could be and the elastic ended up about 1.5cm down from the edge in some areas. When I attached the skirt to the bodice, the stitching was visible, but even worse, I caught some of the skirt in the overlocker (wasn't concentrating properly).  It was ruined with no way to fix it and I was devastated. 

Luckily all that extra fabric came in handy! I cut another skirt from the leftover fabric and a new bodice from the skirt of my first attempt. This time it went together perfectly and I sewed the whole thing up in one evening. Despite my near disaster, this was a really enjoyable project and I can see why Moneta has gained such a following. I'll definitely be making one again (but will be more careful next time. 


I also took the opportunity to go fabric shopping in Manila and picked up some bargains. Lots more projects on the way!

I did try to get a few pics of the dress before I went, but Polly was keen to get in on the action!


Thursday 12 January 2017

Long-haul comfort - Hudson Pants

My January plans now rather unexpectedly include a trip to Manila in the Philippines for work. I'm quite excited and also a bit nervous about such a long business trip. It also presents an opportunity for sewing, of course!  The average temperature there at the moment is 30 degrees in the day, going down to 23 degrees at night, so I'll be digging out all those Summer dresses I made last year.   First though, I wanted to make something comfortable to wear on the (very) long journey there. 

I decided to hunt out a pattern for comfortable trousers/ trackies to wear on the journey. The Hudson Pant pattern from True Bias seemed to fit the bill perfectly - it is a casual, urban style trouser made from knit fabric with wide ankle cuffs. I ordered some super soft french terry from Girl Charlee in a monochrome Aztec pattern, plus some ribbed black jersey for the cuffs, waistband and pocket detail. 

As the waistband is gathered, I cut according to the rest of my measurements because I knew I could cut the elastic for the waist myself and I wanted the bottom of the legs to be tight as intended. The pattern states that is was made for someone who is 5'5", so I knew the leg length would be OK (I'm 5'3"). 

The french terry was much softer with more of a drape than other french terry I've worked with. However, it handled well without being too slippery.  I used the overlocker for most of this project so it was super quick. The only thing I missed out was the cord because I didn't have one and didn't have time to buy one. I have put in the button holes and channel for it though, so will add in. The waist is less gathered than the pattern states, but this allowed me to achieve a good fit. 


I'm not sure why I look so glen in the picture! I had quite a lot of the cotton jersey left, so I made a quick Shannon t-shirt to match. I've made the dress version a few times, but this was the first time I had made the t-shirt. I would add a few centimetres to the length next time. For some reason, the neckline stretched a bit when I was topstitching the seam allowance but it isn't too  obvious  being plain black. 

So now my secret pyjamas are complete, I can head off on my adventure in comfort!


Wednesday 4 January 2017

One year in - reflections and homemade Christmas update

At the start of last year I made the first New Years Resolution that I would ever keep - to write this blog. And what a year it turned out to be. I appeared in Love Sewing magazine on 4 occasions, was interviewed for a bookazine, won a bundle of fabric and. New Coverstitch machine, was linked to from my favourite sewing blog (So Zo), was a Girl Charlee knit pick twice and gained over 430 followers on Instagram. I didn't start the blog with the intention of anything other than recording my own sewing journey, so to have received this level of recognition in year one has been beyond what I could have imagined. More than anything, I have loved becoming part of the growing and very helpful online sewing community. I've gained and given advice, been inspired and even been gifted patterns. So I'll definitely be keeping this up, with some more surprises in store for 2017. 

As usual, my family held another 'Homemade Christmas'. Despite my grumbling, I love doing this and the presents get more impressive each year. My gifts this year were very cheesy matching pyjama bottoms. The patterns I used were the Margot pyjama bottoms from Tilly and the Buttons (ladies), Taylor's pyjama pants (little kids), GBSB book one (Gareth) and a Simplicity pattern - can't remember the number (Dad, Ian and Fin). They were easy to sew and the fit was good on all except the Simplicity ones which were too big of all three. By the end of making them I never wanted to see a pair of pyjama bottoms again!!


As I mentioned, the presents everyone made this year were amazing. I didn't manage to get photos of them all in the chaos, but here are a few: